Tuesday, January 20, 2009

Fun with the Dehydrator: Mexican Crackers

So unbeknownst to you, I spent the last 2 weeks eating only raw foods, mostly fruits and vegetables. I like to do this at least twice a year, just giving my body a chance to rest from the indulgence of the holiday season and focus on whole foods. It's amazing how much better I feel when doing it, and to be honest, it flies by and I'm usually sad to see it end.

In the midst of my 2 week "Rawness," I also purchased a new dehydrator. I had been reading some raw foodie blogs and was intrigued by the raw eating lifestyle, which makes significant use of a dehydrator. According to some of what I've read, it's considered raw if it's not heated above 114 degrees. Essentially, you can warm and dry it while still retaining the desirable enzymes.

One of the toughest things for me during "Raw Time" is not having anything crunchy. Although carrots sprinkled with a little kosher salt are pretty darn satisfying, I sometimes just crave the crunch of a chip or a cracker. The recipe for these crackers turned up while reading some of the forums, so I made some adjustments and created these spicy and tasty crackers. I made them in the dehydrator and cooked them at 105 degrees, but I'm sure you could easily bake these in your oven at a very low temperature. Go ahead and give these a try for something different.
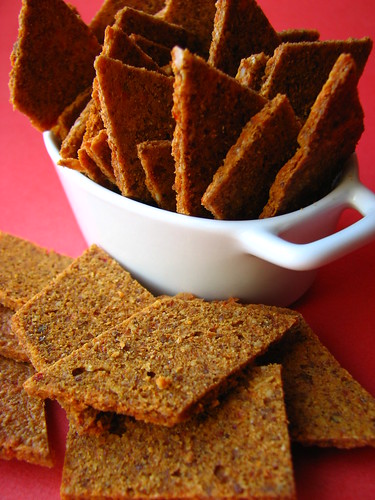
Mexican Crackers

Mexican Crackers

1 cup raw sunflower seeds
1 cup raw almonds
1/2 cup flax seeds
1/2 cup raw cashews
3 plum tomatoes, seeded and chopped
1 red bell pepper, diced
1 tsp cumin
2 1/2 tsp salt (I used Adobo)
1 tbsp taco seasoning mix
1 tsp onion powder
1 tsp garlic powder
1/4 tsp cayenne pepper

In a coffee grinder or food processor, process all seeds and nuts until they are ground into flour. In a larger food processor, combine all seeds and remaining ingredients and process until well mixed and smooth. Spread onto teflex or parchment paper thinly, and place into food dehydrator. Dry for a few hours until dry on top, then flip, remove teflex/parchment, and allow to dry until crispy. (This took another 12 hours). Store in well-sealed plastic container or bag.


Friday, January 16, 2009

Taking your Requests - Cucumber Dill Hummus

Wow - it's been awhile, hasn't it?? I've neglected this for a few weeks, but it sure feels good to be back. And what better way to get back into it than with one of my favorite things to experiment with - HUMMUS!

One thing I love about this blog is that I often get emails from readers, challenging me to take one of their recipes and change it, or they give me awesome suggestions and ask me to come up with a recipe. This recipe is one of the latter, and was suggested by a hummus lover who wanted a Cucumber Dill Hummus. The idea immediately jumped out of the email to me and I knew I had to do it.

As always, this hummus is super easy to make. I think I threw it together in about 15 minutes, and it's a super healthy snack to have on hand. The cucumber and dill fit perfectly, and I think it would be even better topped off with some feta cheese.

On a side note, I have gone through an appliance gathering spree, and have obtained a new food processor, food dehydrator, and blender. I've been experimenting the most with the dehydrator, so don't be surprised if you see some recipes pop up on here for that. And as always, continue to send in your suggestions and ideas. I love to hear from my readers, even when I'm not posting as often as I should. But I promise to have some new recipes for you again next week and get back to my regularly scheduled postings!

Cucumber Dill Hummus

Cucumber Dill Hummus

1 (15 oz) can garbanzo beans, rinsed and drained
2 tbsp freshly squeezed lemon juice
1 tbsp tahini
1/2 tsp salt
1 clove garlic, minced
up to 1/3 cup olive oil*
1 c cucumber, peeled and diced
1 heaping tbsp fresh dill, minced

In a food processor, add garbanzos, lemon juice, tahini, salt, and garlic. Turn processor on and slowly drizzle in olive oil, until it's creamy enough. (*I typically use between 1/4 and 1/3 cup) Add in cucumber and dill, and pulse a few times until well combined but not fully incorporated. Allow to chill in the refrigerator for an hour or so until the flavors get all friendly-like. Enjoy!

Thursday, January 01, 2009

Asian Snack Mix and a Happy New Year!

So the holidays have finally come and gone. Mine were quite enjoyable and actually very relaxing this year. I got to spend time with friends, family, and loved ones, which is really what the holidays are all about.

I rung in the New Year in a very relaxed and quiet way. Some friends of mine had a little get-together and we enjoyed some lovely Vietnamese spring rolls and soup. I brought some edamame to enjoy, but I also wanted to make something to snack on in-between courses. I searched online for Asian snack mix recipes, but couldn't find quite what I wanted, which led me to creating my own.

This is quite an easy recipe to make, and the bulk of the time is spent just baking in the oven. You can kick up the spice as much as you want - the recipe below hits about a 2.5 out of 5 on the hot scale, so feel free to adjust the chili-garlic sauce and cayenne pepper to your own tastes. Also, feel free to change the cereals and other snack ingredients to suit your own tastes.

Happy New Year, ya'll!

Asian Snack Mix

Asian Snack Mix

2 c corn Chex cereal
2 c wheat Chex cereal
2 c mini-pretzels
1 c wasabi peas
1 c Cheez-it crackers (or Goldfish crackers)
1 c Chow-mein noodles
6 tbsp butter, melted
2 1/2 tbsp ginger stir-fry sauce (I used a Kikkoman brand)
2 1/2 tsp chili powder
2 tsp cumin
1/2 tsp salt (I used Adobo)
1 tsp sesame oil
2 tsp chili-garlic sauce
1/4 tsp cayenne pepper

Preheat oven to 250 degrees. In a large baking pan, combine cereals, pretzels, peas, crackers, and noodles. In a small bowl, whisk together melted butter and remaining ingredients. Pour over snack mixture and stir well, coating pieces evenly. Place into preheated oven and bake 30-45 minutes, stirring every 10-15 minutes or so, until pieces are crisp. Remove from oven and cool.

Monday, December 22, 2008

And the Winner is....

Thanks to everyone who entered the drawing for this lovely crockpot cookbook. Sounds like there are quite a few crockpots out there getting some serious use. But a question - those of you that have 3-4 crockpots, are you using them all at the same time? I can barely use my one enough!

But onto the winner. Thanks to random.org, the winner of this cookbook is:

Kits54, who sounds like she could use this book to help feed her family of 8! Her comment was:

As the Mother of 8, 2 vegetarians...I need all the help I can get. I use the crock pot lots, but need to use it even more.

Congratulations, Kits!
And thanks to all who entered!

Wednesday, December 17, 2008

Another Cookbook Giveaway!

So yesterday dumped a nice little batch of wintry mix here on the East Coast. I think I've said it before, but I am not a huge fan of winter. I would much prefer my winter weather to be around the 60-degree mark.

But with that wintery weather comes a desire for warm and filling foods. This is also the time of year when people start digging out those crockpots and cooking hearty warm meals.

1


That's why this book is perfect. It's loaded with recipes for your crockpot, many of which sound quite tasty. It covers the full range, starting with appetizers and running straight through to desserts. There are plenty of whole grain and bean variations too, so vegetarians also have plenty of options of things to make.

Go ahead, leave me a comment saying you'd like to win this book by midnite on December 20th. I'll pick a winner at random on December 21st. Good Luck!!!

Thursday, December 11, 2008

Wild Mushroom and Goat Cheese Puff Pastry Braid

So finals are finally done and thankfully, I'm back in the kitchen. Thanks for all of the birthday wishes last week. And now, the holiday crunch is on. I haven't started any of my Christmas shopping, so I really need to get on the ball.

But with the holiday crunch time comes plenty of holiday parties, which I think is the best part. And when having a party, there is nothing better than having some delicious foods to serve your guests. I think you can file this recipe under "Ace in the Hole" category, as it's super simple to make and throw in the oven, and with the exception of the mushrooms, you can have most ingredients on hand in your kitchen at all times.

The puff pastry did take 40 minutes to thaw, which is perfect time for doing the rest of the prep. The mushroom mixture is really just my 5-Minute Mushroom Sauce, so you know that part is easy. By the time the pastry is ready, the rest of the ingredients are assembled and ready to go. This could also be made in puff pastry shells, adding a small amount of goat cheese and mushroom to each cup. Talk about an elegant finger food!

I think you'll really like this one....

Wild Mushroom and Goat Cheese Puff Pastry Braid

Wild Mushroom and Goat Cheese Puff Pastry Braid
Serves 6-8, appetizer size

2 tbsp olive oil
1 clove garlic, minced
2 cups mushrooms, chopped (I used a combination of crimini, shiitake, and oyster)
a pinch of salt
1 tsp butter
1 tsp fresh thyme leaves
1 tsp balsamic vinegar

1/2 pkg puff pastry sheets
1 (3.5 oz) pkg goat cheese, sliced

Allow puff pastry to thaw at room temperature for 40 minutes. In the meantime, heat olive oil in a medium saucepan. Add garlic and saute for 30 seconds. Add mushrooms and salt, cover, and cook for 3-4 minutes, stirring frequently. Add butter, thyme, and balsamic vinegar, and cook for an additional minute or two. Remove from heat.
Preheat oven to 400. Unroll thawed pastry sheet and lightly roll to get rid of creases. On each side, cut 1" slits into the first crease mark. (Here's an excellent quick video to watch that explains it much better than I ever could.) On center of pastry, layer goat cheese slices down center. Spoon mushroom mixture on top of cheese, then braid pastry over filling. Place into preheated oven and bake for 20-25 minutes, until puffy and golden brown. Serve and enjoy!

Wednesday, December 03, 2008

Celebratin'!

Cranberry Cuppie I

Hey ya'll! I'll be taking off the rest of the week as I am celebrating my birthday today! Please enjoy this recipe for some lovely cranberry cupcakes with dulce de leche frosting that was posted for a blog anniversary awhile back.

Have a great rest of the week!