Tuesday, November 17, 2015

Multi-grain Sandwich Bread, easy enough for beginners

Frequent readers of Home by 28 Cooks know that we are a bread lovin' family. I know, I know - gluten is evil. But gluten is also tasty. And it also happens to be one of the things that my newly-picky-and-exercising-his-independence-to-say-no-to-things-even-when-he-likes-them is one thing my 16-month old hasn't refused. Yet.

I've talked to quite a few people who are scared of bread baking. The multiple steps and rising and all of that mumbo jumbo leaves them afraid to try. And although I must admit baking fresh bread does take some extra time and care, most of it is inactive. And seriously, the result? Amazing.


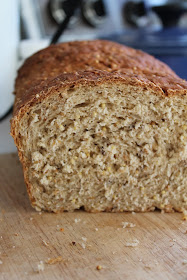
This has become our new standard weekly bread recipe to make. It produces such a wonderful hearty loaf, chock full of whole grains. And seriously, it's easy. Very very easy.


I mean, look at it. Doesn't that look tasty? So if you've been hesitant to try baking bread, I urge you to give this one a try. And if you do, let me know how it turns out!

I do usually double the recipe (like I said, bread family y'all) and I've included the measurements for that down below. We use organic unbleached all purpose flour for ours, but you could also use half whole wheat or even bread flour if you want.


Enjoy!

Multi-grain Sandwich Bread
Makes 1 8x4 or 9x5 loaf
Time: about 4-5 hours, plus another 1-2 hours to cool the loaf

1/4 cup millet
1/4 cup whole wheat couscous (or regular)
1/4 cup steel cut oats
2 tablespoons olive oil (or butter)
2 tablespoons honey (or molasses for a darker loaf)
1 1/2 cups boiling water

2 tsp active dry yeast or 1 1/2 tsp instant yeast
1/4 cup flaxseeds
1 3/4 tsp salt
2 1/4 cup organic all purpose flour

Add millet, couscous, oats, olive oil, and honey to a large glass bowl and stir in boiling water. Allow to cool 15-20 minutes, until temperature of water is about 100 degrees. (or whatever temperature your yeast prefers - check the package for exact temps)

Stir in yeast, then flax seeds, salt, and 1/2 cup flour. Add remaining flour, 1/4 cup at a time, stirring after each addition. (I usually start to use my hands to mix it after about 1 1/4 cup). Scrape down sides of the bowl and cover with plastic wrap. Let mixture sit for 20 minutes. This allows the starches in the flour to absorb the water, which makes the dough smoother and easier to knead. It also allows you to add less flour, which makes a lighter loaf of bread. Fancy bread bakers call this process autolyse.

Uncover the bowl and scrape dough out onto a lightly floured surface. Knead the dough about 7-8 minutes, adding light sprinkles of flour if it starts to stick. You do want the dough to be somewhat tacky when finished.

Round the dough into a ball and place into a large bowl coated with oil. Roll the ball of dough around the bowl a bit to get a light coating of oil on it. Cover the bowl loosely with plastic wrap and leave to rise until doubled, about an hour and a half. (For me, the perfect place is in my oven. I have an electric stove, so I will heat it at 400 degrees for 1 minute, and then turn off. I place the dough in and shut the door and it rises perfectly in there. Gas ovens are typically warm enough without preheating)

Grease your loaf pan with oil. Turn the dough out onto a surface very lightly dusted with flour. Pat into a rectangle, as long as your loaf pan and twice as wide. Roll the dough up snugly, cinnamon bun style, and pinch the seam shut. Tuck the ends under the loaf and roll it a few times, seam side down, to smooth it out. Place the log, seam side down, into the loaf pan. Place the entire pan into a large plastic bag (we use those plastic grocery bags) and tie the bag shut, leaving it inflated to give bread room to expand.

Let the loaf rise until doubled in bulk and 2" above the rim of the loaf pan, which usually takes about 45-60 minutes.

Place a metal or cast iron pan that you don't care about on the floor of the oven or on the lowest rack. Preheat oven to 400 degrees.

Remove the bag from the loaf pan. Fill a 1/2 cup measuring cup with ice cubes. Open the oven and quickly but gently place the loaf pan inside. Toss the ice cubes into the pan on bottom of the oven. Close the door and don't open it for 20 minutes. After 20 minutes, reduce the oven to 350 degrees. Rotate the pan and bake for another 30-40 minutes. A thermometer inserted into the loaf should read 195-200.

Remove the loaf from the pan and let cool completely before cutting (the internal steam continues to cook the bread as it cools).

To double the recipe, double all ingredients, except for yeast. Use 3 tsp active dry yeast or 2 1/2 tsp instant yeast. The rest of the instructions remain the same. 
Monday, November 09, 2015

Acorn Squash stuffed with Wild Rice, Apples, and Toasted Pine Nuts

Well hello to you! Yep, it's been a long time but I'm back. Now that my kitchen helper is almost 16 months old, he loves to supervise in the kitchen from his high chair. And that means more time for me to cook and develope recipes!

Not to say I haven't been cooking the past few months, but since his attention span was so short, I was opting for quick and easy meals that I could throw together in a few minutes. The old pressure cooker and crock pot have really come in clutch the past few months.

Today I'm back with a recipe. I've actually never cooked acorn squash before, but was inspired by a friend's Instagram photo (hey Eva!) to try. And wow - was I impressed and surprised at how easy it was. Not only is it pretty quick to put together, but the flavor of the squash itself is sweet and savory, which lends itself to a wide variety of fillings.


Although I've opted for a vegan filling for this recipe, you could easily throw some sausage in yours, or amp up the crispy panko topping with parmesan. You could also toss in some dried cranberries or golden raisins for a little sweet snap of flavor!

The recipe couldn't be simpler. I halved and scooped out the seeds of 2 acorn squash, and then drizzled them with melted butter, a little sprinkle of brown sugar, and salt and pepper. They roast in the oven for about 20 minutes.


Then for the filling, I started with a lovely wild rice mixture and added some fresh apples and toasted pine nuts. If you don't have pine nuts, try toasted pecans. Either nut will add a delightful little crunch to the recipe. Topped off with panko bread crumbs, they were put back into the oven to toast the tops and bring the flavors all together. At the end, you have a delicious and savory dish that looks incredible! This would be a wonderful side dish for the upcoming holidays.


Any other tried and true ways you like to cook your acorn squash??

Acorn Squash stuffed with Wild Rice, Apples, and Toasted Pine Nuts
Serves 3-4

2 acorn squash
1 tbsp melted butter
1 tsp brown sugar (optional)
Salt/pepper
2 tbsp olive oil
1/4 cup chopped onion
2 cloves garlic, minced
1 1/2 cups cooked wild rice (or brown rice)
1 tbsp coconut aminos (or Bragg's)
1/2 tsp dried thyme leaves
1/2 tsp smoked paprika (or regular paprika)
1 tsp no-salt seasoning blend (I used Trader Joes 21 Seasoning Salute)
1/4-1/2 tsp salt (to taste)
1/4 tsp celery seed
1/4 tsp poultry seasoning
1/2 cup diced apple
2 tbsp toasted pine nuts (or pecans or walnuts, diced)
1/2 cup seasoned panko bread crumbs
2 tbsp melted butter

Preheat oven to 450. Cut squash in half, scoop out seeds, and drizzle with melted butter. Sprinkle with brown sugar and season with salt and pepper. Place in oven and bake until just fork tender, about 25 minutes. 

Meanwhile, heat up olive oil in medium sized pan. Saute onion 4-5 minutes, until becoming soft and opaque. Add in garlic and saute another minute or two. Remove from heat and stir in rice, aminos, seasonings, apples, and nuts. Stir well to combine. 

In a small bowl, combine butter and panko crumbs Set aside. 

Remove squash from oven. Fill each piece with rice filling and top with panko crumbs. Place back into the oven and bake another 20-25 minutes, until top is toasted brown and filling in heated through. 

Serve and enjoy!!


Saturday, July 18, 2015

It's Zucchini Season, Y'all!

So zucchini is starting to overwhelm local gardeners, so I thought I'd post a few recipes that are great for using up some of that fresh produce. I just made 2 of these recipes myself in the past week, and am sure I'll be using the rest shortly.

Although this original recipe for Indian Fritters was made with eggplant, I tried these using some fresh zucchini and they were amazing!

Indian Eggplant Fritters

This Cilantro Zucchini Hummus is one of my favorite recipes for zucchini of all times. I just made a huge batch of this and have been using it to dip carrots into or to toss with fresh salad greens.

Cilantro Zucchini Hummus

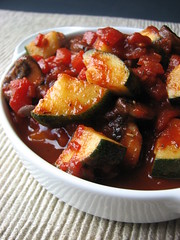
Want a quick AND easy dinner? You can have this Summer Vegetable Cacciatore on the table in under 25 minutes. You can't beat that!

Vegetable Cacciatore I

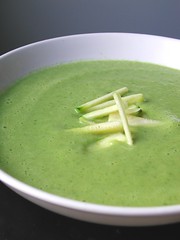
This oldie-but-goodie recipe is quick, easy, and tasty. I made this Curried Zucchini Soup a few weeks ago and it was the perfect meal.

Curried Zucchini Soup

Thursday, July 16, 2015

Roasted Poblano and Summer Squash Soup

Summer seems like an odd time to be eating soup, doesn't it? Yet for some reason, this week, I've been craving it. But even if you're not up to a hot bowl of something when it's hot outside, summer is a great time to make a soup and freeze for cooler times.

I know I'm not alone in having an overwhelming abundance in summer squash and zucchini. This year, I'm determined to use up every single one in a new way. So far, it's been going great. We've made Bread and Butter pickles with squash, and they are exceptional! I'll be posting a recipe later this week.

Our pepper plants also seem to be working overtime, and I just picked some lovely poblano peppers this morning that I wanted to use up. You can't go wrong roasting vegetables for soup, so I decided to throw some zucchini and poblanos in the oven and then make a soup. I also threw in a red onion and some garlic, because why not?


Here it is after roasting in the oven, in all of it's roasted gloriousness.


After roasting, the rest of the soup couldn't be easier. Simply add water or stock, a few spices, and blend it all up in a blender or with an immersion blender. And viola! You've got yourself a bowl of warm summery goodness.

This soup also freezes extremely well, so make a double or triple batch and put some away for the winter.

What are you doing with your zucchini abundance? And if you need some more zucchini recipes, check back tomorrow for some ideas!


Roasted Poblano and Summer Squash Soup
 
3 large summer squash, seeded and roughly chopped into 2-3" pieces
2 poblanos, seeded and cut into eights
3 cloves garlic
1 medium red onion, quartered
2-3 tbsp. olive oil
1/2 tsp salt
Pepper
4 cups water (or stock)
1/2 tsp cumin
1/2 tsp garam masala
1/2 tsp white wine vinegar
salt to taste
 
Heat oven to 425. Place squash, poblanos, garlic, and red onion in 13x9 baking pan and drizzle with olive oil, salt and pepper. Toss well and place into oven. Roast 30-45 minutes until vegetables are soft and browned. Place into a large soup pan over medium heat. Add remaining ingredients and blend with an immersion blender. Serve and enjoy!

Tuesday, June 23, 2015

Sourdough Focaccia


Those that know me are aware of my passion for bread baking. The entire process just makes me happy. And earlier this year, I resolved to conquer my fear of sourdough. At some point in the past, I tried the "DIY sourdough starter" and it didn't work and ended up getting pretty gross. A few months ago, I found a starter in one of my favorite health food stores, so I thought I'd try it again. And it's been wonderful.


We lovingly refer to the starter as "Hank," because, well, everything in our house gets nicknames. So we'll talk about feeding Hank and making sure Hank has had dinner and well...Hank has really become part of the family.

Here's his home on top of my fridge.


Anyway, so Hank has been maturing and has the most delightful "sourdough" smell to him and makes the best breads. I've tried him in baguettes and multigrain sandwich bread and pancakes and there's still so many things I want to try.

But one of my favorites is sourdough focaccia. This recipe is definitely a staple around here and we make it.....let's just say we make it rather frequently. But it's easy and you can top it in so many ways. Today's variety was just Italian seasoning, garlic powder, cracked pepper and coarse sea salt.


Or we've done kalamata olives and thinly sliced onion. Or my favorite combination - raisin and rosemary. Seriously it's crazy delicious. But what I love about the recipe is it's relatively simple. You mix it all up, knead it for a few minutes, let it rise twice, and then it's ready to go.

There are so many great primers out there for sourdough, so I won't go into the nitty gritty, but suffice it to say it's so much easier than I thought and it really doesn't require a lot of extra work. I keep Hank out on top of my fridge because I use starter almost every day (between baking and giving it to friends) but you can easily keep it in the fridge and only feed it once a week. Very very easy. So give sourdough a try. It's so worth the effort.

And if you live close, you're welcome to stop by and get a little Hank Jr. to take home.

Sourdough Focaccia

1 cup sourdough starter, fed or unfed
3/4 cup warm water
2 tsp instant yeast
3 cups flour
1 1/2 tsp salt
3 tbsp. olive oil

Topping
1-2 tbsp. olive oil
Italian seasoning, garlic powder, coarse sea salt, pepper, etc
kalamata olives, onions, etc

Combine all dough ingredients in a large bowl. Mix together well and knead for 5-7 minutes until dough is smooth. Place in a lightly greased bowl and let rise for at least an hour. Punch down, then let rise again for at least another hour.

Lightly grease a 9x13 baking pan or cookie sheet and pat or roll dough into a long rectangle in the pan. Brush the olive oil over the dough and sprinkle with herbs and desired toppings. Loosely cover with plastic wrap and let rise for 20 minutes.

Meanwhile, preheat oven to 425. Remove plastic wrap and bake for 15-20 minutes, until golden brown. Remove from pan and slice when warm.

Wednesday, June 03, 2015

Clean-Out-The-Fridge Crockpot Curry

Around these parts, we like to do Pantry Week every once in awhile, which is a great opportunity to use up some of those items that seem to languish forever in the fridge and pantry. It's also a great time to clean out any of those just-about-to-turn vegetables that seem to lurk in the corners.

This recipe is perfect for Pantry Week and Clean Out The Fridge days. You can use pretty much any vegetable that you want, and the rest is just spices and items that you probably have in your pantry already. And it spends a few hours simmering in the crockpot after only a few minutes of throwing everything together, so it comes in clutch for those days you don't have much time.


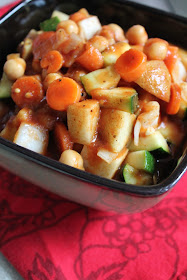
I used a potato, onion, some carrots, and a zucchini, but you could easily use mushrooms, sweet potatoes, celery, green peppers, or whatever else you want. A can of garbanzos was thrown in, but feel free to use black beans, navy beans, or cannellini beans if you want. I've even thrown in a cup of uncooked red lentils, which cook up beautifully. Seriously - don't overthink it. Just chop up your vegetables, mix in the rest of the ingredients, and let it simmer for 6-7 hours.

It's deliciously warm and comforting with just the amount of spice. We had it over green bamboo rice that's been eyeballing me from the corner of the pantry for an embarrassingly long time, but you could easily use quinoa, your favorite rice, or any other grain that makes you happy.

So go ahead, clean out that pantry and fridge and give this recipe a try!


Clean Out The Fridge Crockpot Curry

1 potato, chopped
1 medium onion, chopped
1 zucchini, chopped
2 large handfuls of baby carrots, chopped
1 can chickpeas, drained and rinsed
4 cloves garlic, minced
1 (15oz) can tomato sauce
1 cup vegetable broth
1 tsp garam masala
1 tsp ground coriander
1 tsp cumin
1 tsp smoked paprika
1/2 tsp yellow mustard seed
1/2 tsp turmeric
1/2 tsp ginger
1/4 tsp celery seed
1/4 tsp (or more) cayenne
Salt/pepper to taste

Combine all ingredients in crockpot and simmer on low for 6-7 hours, until vegetables are tender.

Looking for more Pantry Week recipes? Try these!
Spicy Zucchini and Mushroom Saute
Grilled Enchilada Pizza
No Knead Bread
Roasted Eggplant and Tomato Bisque


Monday, June 01, 2015

A Garden Update

Can't believe how fast time is flying. Here it is - already the first day of June. In just a little over a month, the baby will be a year old. How did that happen so fast?!?

We've been so busy working on a project which we'll be sharing later on our blog, but for now, I thought we'd do a little update of what our garden looks like right now. I apologize in advance for the picture heavy post.

We'll start with fruit. Our black raspberry bushes have EXPLODED in our yard, which is fine by us! We planted 2, just 2, small plants 2 years ago. Last year, we picked 9 QUARTS from those bushes. This year, we will far far outdo that total.


They should be ready in a few weeks, and I can't wait.


We also added a potted blueberry bush this year. We don't have any real space to devote to any more fruit, so we've started adding some things in containers. This tiny bush has a surprising amount of fruit on it!


I've been wanting a citrus tree for years. Not only do the flowers smell amazing, but then you get citrus fruit from them! This year, we added a Meyer lemon tree, and we already have quite a few tiny fruits on it. I can't wait to see how this turns out.


Now on to the vegetables. One thing I really like about the gardening process is that it's an everchanging game. Every year, we make adjustments, crossing things off the list we don't really use or that don't have a good return on the space they take up. Last year, we learned that although we love watermelons and broccoli and cauliflower, they just take up far too much space in our little yard to make it worth our while. Some things stay on the list though, like tomatoes. Here's our tomato beds.


Here's our peppers and eggplants. And yes, we need to weed like WHOA! =)


We also have kale and lettuce, which is doing quite nicely. (You can see our cinderblock strawberry plants around the border)


Then we also have a cucumber and squash raised bed. This year, we planted patty pan, yellow squash, 8 ball squash and 2 types of cukes.


Hello little squash baby!


And here the herb section. We have lovage, basil, chamomile, oregano, sage, rosemary, parsley, chives, stevia, and thyme.


You can see the lemon balm has exploded.


And every year, we like to try something different. Last year, we did dried beans and they turned out quite amazing and will be a repeat. This year, we decided to try peanuts! We have 2 going in our potato bags and so far, so good.


We still have to plant our beans later this month, and we have 2 flower beds that are planted but are pretty boring to look at right now so I'll share those when there are more blooms going on. Here's the only thing blooming so far - a gorgeous fuchsia plant.


Hope your gardens are doing well!

Thursday, May 28, 2015

Hearty Indian-spiced Chickpea Salad

We make this recipe pretty much on a weekly basis round here in the 28 Cooks kitchen and I just realized I've never shared it on my blog. So let's rectify that immediately.

Vegetarians and vegans are often left out of the sandwich game. Sure, cheese sandwiches and veggie sandwiches have their place, but you can only eat so many of them. Sometimes you want something hearty - something that sticks with you. You want to open your lunch bag at work, pull out a sandwich and have people say "Now that looks tasty! What is that??" Enter the chickpea salad.

Everyone and their mother on Pinterest has some version of this salad, but I'd like to think mine is up there with some of the tastiest ones. And it couldn't be easier.

Start with chickpeas. You can use canned chickpeas, although we keep some in the freezer at all times just for this recipe.


Never tried freezing chickpeas? It's simple - take 4 cups dried chickpeas (or any dried bean for that matter) and add to pressure cooker with 6 cups water. And no, I don't mess with any of that presoaking nonsense. Ain't nobody got time for that. Sometimes I'll get real fancy and throw in a bay leaf or two, but more often than not, it's just the beans and water. Cover, bring to pressure, and cook per your pressure cooker's instructions. (Mine take about 45 minutes) Release pressure, rinse in cool water, dry, and freeze in bags.

Anyway, take some chickpeas, and add chopped carrots, onions, and pickles. Add celery if you want. There really is no wrong answer here. I like my salad on the drier side so I add just enough mayo to pull it together. Add more if you want. Mix in the spices and boom! You've got chickpea salad.

This makes great sandwiches and packs really well for brown bag lunches. My very favorite bread is a Rosemary Raisin variation of my One Hour French Bread recipe. Or keep it gluten free and put on top of a salad or in a lettuce wrap.


Hearty Indian-spiced Chickpea Salad
3 cups (or 2 cans) rinsed and drained chickpeas
4 tbsp. mayo (more or less, depending on your preference. Use vegenaise to keep it vegan)
1/2 cup chopped carrots
1/2 cup chopped onion
1/4 cup chopped pickles
3/4 tsp curry powder
1/2 tsp cumin
1/2 tsp ground coriander
1/4 tsp celery seed
1/8 tsp cayenne pepper
1/2 tsp salt
Freshly cracked pepper to taste

Place chickpeas in a bowl and mash with a potato masher. I like a little texture in mine, but feel free to smash them as much as you want. Add remaining ingredients and stir to combine. Allow salad to chill in the fridge for an hour or two for flavors to get all friendly like. Enjoy!

Thursday, May 21, 2015

Baked Wild Cod with Tapenade and Pine Nut Breadcrumbs

Who doesn't love a recipe that delivers big on flavors and taste, yet only requires about 10 minutes of active cooking time, 20 minutes in the oven, and only 6 ingredients?? This is the kind of recipe you keep on hand for guests that's easy yet looks like you spent hours in the kitchen making it.

I love a good baked fish recipe. My husband came home with a lovely piece of wild cod and I needed a quick and easy recipe that didn't require a lot of time and attention.

I made a little breadcrumb mixture by just processing 2 small slices of bread I made earlier in the week and pine nuts.

I toasted them on the stove in a bit of olive oil until they were nice and crispy. While they were cooking, I mixed a bit of mayonnaise with a few spoonfuls of tapenade, which was spread on the fish. I love this one from Trader Joes, but feel free to use whatever brand you want.


Or if you don't have tapenade, just chop up some olives! Don't like olives? Try some pesto instead!

The crumbs were then patted on top of the fish and into the oven it went. After 20 minutes of baking, it came out flaky, delicious, and moist. This recipe is definitely going to be on the "repeat" list.


Baked Wild Cod with Tapenade and Pine Nut Breadcrumbs
 
2 slices of bread
1/4 cup pine nuts
3 tsp olive oil
1 lb filet of wild cod (or tilapia, halibut, flounder, etc)
salt/pepper
2 tbsp. mayonnaise
4 tsp prepared tapenade
 
 Heat oven to 425. In small food processor, process bread and pine nuts until coarse crumbs form. Heat olive oil over medium high heat in small skillet. Add crumbs and stir well, coating with oil. Cook for 3-5 minutes, until crumbs are golden brown. Meanwhile, season fish with salt and pepper and place in lightly oiled baking dish. In a small bowl, combine mayo and tapenade. Spread onto fish. Remove breadcrumbs from heat and spread on top of fish.
 
Place fish in oven and bake for 20-25 minutes, until fish flakes easily with a fork. Remove from oven and serve.

Wednesday, May 20, 2015

Chive Blossom Vinegar

I've always been a warm weather girl. Blame it on my California roots, but there is nothing like spring and summer to me. I'm even one of those weird ones that doesn't mind humidity at all and almost relishes that "I can't breathe" feeling when you open the doors on a hot and humid summer day.

Some of my favorite childhood summer memories are from spending hours outside in the garden with my mom, who has the most incredible green thumb. When I was too young to really help, she'd give me a spray bottle and have me "water the plants." It was the coolest thing to me when I was young and I remember doing it for what seemed like hours.

Now that we have our own garden, there's nothing I love more than spending time outside, planting, trimming, and harvesting from our garden. Later this week, I'll give you a tour of what's in there this year, but today, let's talk about something from my herb garden.

Chives are some of the most effortless herbs to grown, because no matter what you do or how you neglect them, there's always some lovely purple chive blossoms every Spring. Last year, I decided to make some chive blossom vinegar and I think it just might be my new favorite way to use them. It has the most delicious mild onion flavor and is incredible for making salad dressings, adding to summer potato salads, or balancing the flavors in a light summer soup.


Chive blossom vinegar really couldn't be easier to make. You can make as small or as large of a batch as you want - simply cut as many blossoms that can fill a small mason jar. I use my salad spinner to give them a quick rinse and then spin them dry.


Pack into a mason jar and fill with whatever vinegar you choose. Last year, I used white wine vinegar and this year, I decided to go with an apple cider vinegar. Fill and top jar with a non-corrosive lid. I used plastic, but I've also used the traditional metal ring lid with a piece of parchment paper underneath to protect from corrosion.

Place in a cool dark place for a few weeks (I just put them in the back of my fridge) and wait. After 2-3 weeks, remove from fridge and strain out blossoms. You'll be left with the most gorgeous dark pink vinegar. Store the fridge indefinitely, although ours never seems to last long.


Enjoy!

Wednesday, May 13, 2015

One-hour Parmesan Peppercorn French Bread, aka. my very favorite quick bread recipe

It's no secret that I love baking bread. I love the entire process - the kneading by hand, the multi-step process of rising and punching down and rising.  My kitchen is stocked with specialty bread pans, sourdough starters, and banetton baskets.

But I've got a 10-month old now, which means my time in the kitchen has to be shorter and well planned. So an all day bread recipe that requires several carefully timed steps just doesn't fit in my day. Enter Saf-Instant yeast. Saf-Instant can be added directly to your dry ingredients without it having to be activated in water first and is more than twice as active as regular compressed yeast. Which means you can have freshly baked bread on the table in an hour. No, seriously.


This recipe is a life saver. It requires about 10 minutes of active time (mixing, kneading, etc) and then 25 minutes to rise and 25 minutes in the oven. That's it. And then you have fresh bread coming out of the oven.  And this dough is so versatile and can be shaped into French bread loaves, sandwich loaves, or even hamburger/hoagie buns. You can make it plain or you can jazz it up, like the recipe below. Here it is, all dressed up with parmesan cheese and freshly cracked peppercorn.


Other variations that have been amazing? Italian seasoning and garlic powder, brown sugar and raisins, feta cheese and kalamata olive, sharp cheddar and diced jalapeno - the list goes on and on. Just use whatever strikes your fancy!

This recipe makes 2 French bread sized loaves, so you can do more than one type if you want! Or give the extra to a friend, because who doesn't love freshly baked bread?


Oh, and this bread makes fantastic toast!


One-Hour Parmesan Peppercorn French Bread

5 1/4 cups flour (I've used AP flour, whole wheat, and bread flour and they all come out great)
3 tbsp. sugar
1 1/2 tsp salt
1 1/2 tbsp. yeast
1 1/2 tbsp. oil (I usually use olive oil)
2 cups warm water (around 100 degrees F)
1/4 cup Parmesan cheese
1 tbsp. freshly cracked coarse peppercorns
Coarse sea salt for topping (optional)

Mix dry ingredients in a large bowl and whisk well to combine. Make a well in the center and add wet ingredients. Mix into dry ingredients for a minute until it's mostly all together. Dump out on the counter and knead for 4-5 minutes. Divide dough in half. Roll each ball of dough in a large rectangularish shape about 1/4" thick. Sprinkle dough with half parmesan cheese and peppercorn. Roll up dough, starting with the long side. Place seam side down on a parchment paper lined baking sheet. Repeat with other ball of dough. Top with coarse sea salt if desired. Cover with plastic wrap and let rise in warm place for 25 minutes.

Preheat oven to 350. Remove plastic wrap from risen dough and slash the top with a sharp knife or razor. Place dough in oven and bake for 25-30 minutes, until golden brown and sounds hollow when tapped on the bottom. Remove from oven and allow to cool on cooling racks.

Monday, May 11, 2015

Lemon Balm & Sage jelly

A few years ago, I put in a small raised bed herb garden. I planted a few things and every year, I'll fill in empty spots with new herbs. I don't remember planting Lemon Balm, but was pleasantly surprised to see it make an appearance this spring. The smell is intoxicating and every time I was weeding or doing something in the garden, I'd walk past and grab a leaf and smell it.


I did some research on lemon balm and Wow! There are a ton of benefits and uses for this wonderful and medicinal herb, including mosquito repellant, used for healing cold sores and fevers, good for conditioner for oily hair or in face washes for acne, and the list goes on and on. I flipped through several recipes for it and jotted several down, but for some reason, making an herb jelly just kept popping up in my mind.

If you've ever planted a sage plant in your herb garden, you know that it will grow like CRAAAAZZYY and produce far more sage than any normal person could ever consume, although we try hard to use ours up! I decided to also throw in some sage and it really adds a nice note to the jelly.

If you're new to jelly making, this is about as easy as a recipe as you can find. I've included instructions for easy no-hot water bath canning, or you can hot water bath process for 10 minutes. And here's another jelly recipe that is super easy and makes good use of summer produce - Hot Pepper Garlic Jelly!


Lemon Balm Jelly

1 c. lemon balm, washed well
1/4 c sage leaves, washed well
3 c. water
1 1/2 tbsp. fresh lemon juice
6 1/2 c. sugar
1 packet Liquid Certo
1 tbsp. minced lemon balm leaves
Bring water to near boil, add herbs, and steep lemon balm and sage for 10-20 minutes. Strain well and discard leaves. Bring herb infusion and sugar to a rolling boil, add pectin and cook and stir for 2 minutes. Remove from heat and stir in minced lemon balm leaves.  Pour into 1/2 pint jars and seal.

*The easiest way to can is this - wash and dry canning jars thoroughly. Place lids and rings in a pot of barely simmering water. Once jelly is ready, fill a jar, leaving about a 1/4" headspace. With tongs, remove lid and ring from water, place on jar, and tighten, although not all the way. Turn jar upside down on a dishtowel. Repeat with remaining jars. Allow to cool for 10-15 minutes. Turn upright and allow to seal. Tighten rings on all jars. If any of the jars don't seal, simply store in the refrigerator once cool. The other jars can be stored in a pantry for 8 months to a year, if it lasts that long.