Weekend Herb Blogging Roundup
I am honored to be hosting this week's Weekend Herb Blogging Roundup. We've got plenty of excellent recipes this week, and I'm sure you'll be adding a few of these to your "Must Try" list, as I have.
Unfortunately, due to circumstances such as moving my parents into their new home, and coming down with some sort of virus, I didn't get the chance to get into the kitchen to make my own herb recipe! However, I think you'll find plenty of good recipes in this recap. So without further ado, let's begin!
Absolute Green starts us off with a lovely recipe for a Broccoli and Green Tea Soup, which I simply must try. The combination of flavors must be absolutely insane!
The Chocolate Lady posted a lovely article about Lavender, and a suggestion for lavender tea, which sounds positively lovely.
Looking for some great food pictures? Head over to The Serendipitous Chef's site for a chock-full-o-photos posting with a recipe for Mustard Spinach Frittata. I must admit I've never tried mustard spinach, but this recipe definitely sounds like a good one to start with.
Before I introduce the next recipe, let me first say as of late, I have been completely obsessed with truffles and truffle oil. So this next recipe from Thyme for Cooking, Caramelized Onion Crespeu with Parsley and Truffle Oil, definitely piqued my interest. This is definitely on the "Must Make" list.
Ulrike from Germany gives us some great information on broad beans and provides us with a lovely recipe for Broad Beans, Pasta, and Bacon, which sounds simply tasty. It's also super simple, so you could whip this up in no time!
Who doesn't love garlic? Haalo provides us with a lovely recipe for a garlic anchovy dip, Bagna Calda, which I'm sure would be absolutely insane with fresh bread.
Nothing says "Fall's here!" like the taste and flavors of biting into a fresh apple. Veggie Gardening Tips has a great article on Heirloom Apples. It's chock full of information, so you won't want to miss this one.
Almost Turkish has a great recipe for Pub Style Bulgur Pilaf, which also went directly to the "Must Make" list. It's a great one-pot main or side dish.
There's so many great posts this week that are loaded with great information. Calendula and Concrete's post on Cranberries and how they are harvested is no exception. There's also some great pictures.
Sugar Delirium has a great recipe for Ina's Roasted Brussel Sprouts. If you haven't liked brussel sprouts in the past, you should definitely try this recipe, because I'm sure you'll fall in love with them.
Gattina has gorgeous photos and recipe for Zucchini Boats with Corn Stuffing. My mouth is watering just looking at this post!
There's something very satisfying about making your own bread from scratch. Saffron Trail has a lovely recipe for Potato Rosemary Focaccia Pugliese, which looks incredibly amazing.
Kalyn's post this week is for a great-looking Thai Chicken Soup, and concludes her month long-postings with cilantro recipes. It looks awesome, and I think I'll have to try and veganize it.
Food Lover's Journey has such an incredible recipe for Five-Spice Tofu with Lemongrass Topping that I might have to give tofu another try. I adore lemongrass, and this recipe definitely makes good use of it.
Christine Cooks up a lovely Butternut Squash Bisque with Maple Syrup and Sage which looks absolutely divine!
Our last recipe today in the roundup comes from Ask Ruth. It's a great article entitled "Great Food Fast" which gives some excellent tips for preparing meals with maximum efficiency.
Thanks to everyone for participating this week! Next week's roundup will be back at home at Kalyn's Kitchen.
Sunday, October 29, 2006
Wednesday, October 25, 2006
Pickled Garlic
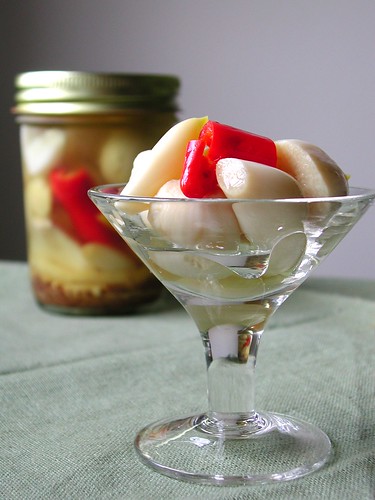
When I made the pickled vegetables a while ago, I was surprised by how mellow and tasty the garlic became after a few days of pickling. It completely loses the harshness and overpowering bite that raw garlic has, and takes on more muted tones.
While flipping through "Preserving the Harvest," I came across this recipe for pickled garlic. It looked like such a simple recipe, so I decided to give it a try. I was pleasantly surprised by the results.
These pickled cloves would be excellent by themselves, stuffed into olives for a quick appetizer, or even tossed into a martini. I also think they would be a flavorful addition to any dish that calls for garlic.
Pickled Garlic
6 ounces white vinegar
4 ounces water
2 tsp coarse salt
1/8 tsp Old Bay seasoning
2 large heads of garlic, peeled
Rind of one lemon, in 1 or 2 strips if possible
1/2 tsp dill seeds
1/2 tsp celery seeds
1 small red chili pepper, whole
In a small saucepan, combine vinegar, water, salt, and Old Bay and bring to a boil. Add garlic and simmer 10-15 minutes, over very low heat. Place lemon rind, dill, celery seed, and chili pepper into a 1-pint jar (or 2 1/2 pints). Ladle in garlic cloves, cover with liquid, cap and seal well. Cool at room temperature. Store in fridge for 3-4 days before using.
When I made the pickled vegetables a while ago, I was surprised by how mellow and tasty the garlic became after a few days of pickling. It completely loses the harshness and overpowering bite that raw garlic has, and takes on more muted tones.
While flipping through "Preserving the Harvest," I came across this recipe for pickled garlic. It looked like such a simple recipe, so I decided to give it a try. I was pleasantly surprised by the results.
These pickled cloves would be excellent by themselves, stuffed into olives for a quick appetizer, or even tossed into a martini. I also think they would be a flavorful addition to any dish that calls for garlic.

Pickled Garlic
6 ounces white vinegar
4 ounces water
2 tsp coarse salt
1/8 tsp Old Bay seasoning
2 large heads of garlic, peeled
Rind of one lemon, in 1 or 2 strips if possible
1/2 tsp dill seeds
1/2 tsp celery seeds
1 small red chili pepper, whole
In a small saucepan, combine vinegar, water, salt, and Old Bay and bring to a boil. Add garlic and simmer 10-15 minutes, over very low heat. Place lemon rind, dill, celery seed, and chili pepper into a 1-pint jar (or 2 1/2 pints). Ladle in garlic cloves, cover with liquid, cap and seal well. Cool at room temperature. Store in fridge for 3-4 days before using.
Tuesday, October 24, 2006
Weekend Herb Blogging
Hello all! I will be this week's host for the Weekend Herb Blogging. If you haven't heard of it, Weekend Herb Blogging is a food blogging event sponsored by Kalyn's Kitchen where each week food bloggers around the world photograph and write about herbs, plants, veggies, or flowers, and on the weekend, we publish a Recap with links to all the posts. It's a great way to get some excellent recipes. For more information, click here!
Looking forward to showcasing all of this week's entries on Sunday!
Looking forward to showcasing all of this week's entries on Sunday!
Friday, October 20, 2006
Orange Pomegranate Mousse
While waiting in line for my usual coffee at Starbucks, I started flipping through the current edition of Martha Stewart's Everyday Food magazine. Although I didn't see too much that caught my eye, I did see a Orange Yogurt Mousse recipe that looked interesting. Although the idea of just orange and yogurt didn't intrigue me, the idea of the mousse did, so I mentally filed it away to be used at a later date.
A bit later, while doing some grocery shopping, I came across some fresh pomegranate juice. The mousse recipe immediately popped back in my head, and this is the end result.
I must admit I wasn't sure how it would all come together, but I fell deeply, madly, and truly in love with this from the very first bite. The pomegranate and orange lend a lovely base flavor to the tanginess of the yogurt, which all combines together into a light and refreshing wonderful dessert.

Orange Pomegranate Mousse
Zest from 1 orange
1 1/2 c heavy whipping cream
3/4 c sugar
1/8 tsp salt
1/2 c pomegranate juice
1 pkt unflavored gelatin
32 oz plain yogurt
Combine zest, 1/2 c heavy whipping cream, sugar, and salt in a small saucepan. Bring to a boil, lower heat, and simmer 5 minutes. Remove from heat, cover, and allow to sit for 20 minutes. In a small bowl, pour pomegranate juice. Sprinkle gelatin over juice, and set aside for 5 minutes. Meanwhile, bring cream mixture back to a simmer. Remove from heat and pour into a large bowl. Add juice mixture and whisk well. Slowly whisk in yogurt. Cover and place into refrigerator for 30 minutes. Remove from refrigerator. With cold metal bowl and beaters, beat remaining whipping cream until semi-stiff. Fold into yogurt mixture. Spoon into 6 bowls or wine glasses, and allow to set in refrigerator for 3-4 hours. Garnish with fresh orange segments or pomegranate seeds.
While waiting in line for my usual coffee at Starbucks, I started flipping through the current edition of Martha Stewart's Everyday Food magazine. Although I didn't see too much that caught my eye, I did see a Orange Yogurt Mousse recipe that looked interesting. Although the idea of just orange and yogurt didn't intrigue me, the idea of the mousse did, so I mentally filed it away to be used at a later date.
A bit later, while doing some grocery shopping, I came across some fresh pomegranate juice. The mousse recipe immediately popped back in my head, and this is the end result.
I must admit I wasn't sure how it would all come together, but I fell deeply, madly, and truly in love with this from the very first bite. The pomegranate and orange lend a lovely base flavor to the tanginess of the yogurt, which all combines together into a light and refreshing wonderful dessert.

Orange Pomegranate Mousse
Zest from 1 orange
1 1/2 c heavy whipping cream
3/4 c sugar
1/8 tsp salt
1/2 c pomegranate juice
1 pkt unflavored gelatin
32 oz plain yogurt
Combine zest, 1/2 c heavy whipping cream, sugar, and salt in a small saucepan. Bring to a boil, lower heat, and simmer 5 minutes. Remove from heat, cover, and allow to sit for 20 minutes. In a small bowl, pour pomegranate juice. Sprinkle gelatin over juice, and set aside for 5 minutes. Meanwhile, bring cream mixture back to a simmer. Remove from heat and pour into a large bowl. Add juice mixture and whisk well. Slowly whisk in yogurt. Cover and place into refrigerator for 30 minutes. Remove from refrigerator. With cold metal bowl and beaters, beat remaining whipping cream until semi-stiff. Fold into yogurt mixture. Spoon into 6 bowls or wine glasses, and allow to set in refrigerator for 3-4 hours. Garnish with fresh orange segments or pomegranate seeds.
Wednesday, October 18, 2006
Curried Pumpkin and Black Bean Soup
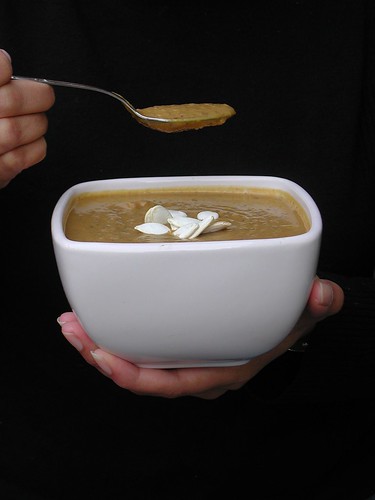
Although I'm not a winter person at all, I must admit I do enjoy a month or two of colder weather. I love rushing home in the cold with the thoughts of a warm blanket and a bowl of comforting soup waiting for me.
Typically, I am not a huge fan of cream-based soups, and much prefer broth-based. However, I do love a pureed soup, and this is such a wonderful combination of flavors. Amazingly enough, the pumpkin and the black beans are wonderful together, and the curry and cumin give it even more of a unique flair.
My roommate's mother, Jan, who is an amazing cook, graciously offered up this recipe. Although I've added the black beans, changed the spices a bit, and made it vegetarian, it pretty much remains true to her recipe.
Curried Pumpkin and Black Bean Soup
2 tbsp butter
1 c onion, diced
2 cloves garlic, minced
1 1/2 tsp curry powder
1/2 tsp cumin
1/2 tsp salt
2 tbsp flour
3 c soymilk
2 c vegetable broth
2 c canned pumpkin puree
1 (15 oz) can black beans, drained and rinsed
1/2 tsp cayenne pepper
1/8 tsp dried thyme
1/8 tsp nutmeg
Melt butter in large saucepan. Add onion and garlic, and saute over medium high heat until tender. Add curry powder, cumin, and salt. Saute for an additional minute or so. Whisk in flour, and whisking constantly, cook for an additional minute. Slowly whisk in soymilk. Allow to simmer for a minute before adding remaining ingredients. Bring to a boil, lower heat, and simmer 5 minutes. Blend until smooth, either using a stick blender, or pouring into a blender in batches. Return to pan and simmer an additional 5 minutes. Serve with toasted pumpkin seeds as garnish.
Although I'm not a winter person at all, I must admit I do enjoy a month or two of colder weather. I love rushing home in the cold with the thoughts of a warm blanket and a bowl of comforting soup waiting for me.
Typically, I am not a huge fan of cream-based soups, and much prefer broth-based. However, I do love a pureed soup, and this is such a wonderful combination of flavors. Amazingly enough, the pumpkin and the black beans are wonderful together, and the curry and cumin give it even more of a unique flair.
My roommate's mother, Jan, who is an amazing cook, graciously offered up this recipe. Although I've added the black beans, changed the spices a bit, and made it vegetarian, it pretty much remains true to her recipe.

Curried Pumpkin and Black Bean Soup
2 tbsp butter
1 c onion, diced
2 cloves garlic, minced
1 1/2 tsp curry powder
1/2 tsp cumin
1/2 tsp salt
2 tbsp flour
3 c soymilk
2 c vegetable broth
2 c canned pumpkin puree
1 (15 oz) can black beans, drained and rinsed
1/2 tsp cayenne pepper
1/8 tsp dried thyme
1/8 tsp nutmeg
Melt butter in large saucepan. Add onion and garlic, and saute over medium high heat until tender. Add curry powder, cumin, and salt. Saute for an additional minute or so. Whisk in flour, and whisking constantly, cook for an additional minute. Slowly whisk in soymilk. Allow to simmer for a minute before adding remaining ingredients. Bring to a boil, lower heat, and simmer 5 minutes. Blend until smooth, either using a stick blender, or pouring into a blender in batches. Return to pan and simmer an additional 5 minutes. Serve with toasted pumpkin seeds as garnish.
Monday, October 16, 2006
Basil Wine Jelly
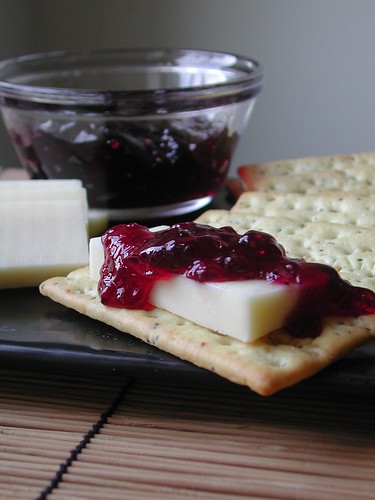
One of my favorite things to eat is cheese. Soft cheese, hard cheese, French cheese, goat cheese - almost any kind of cheese you name, I like. Last night, I had a lovely cheese sampler plate at one of my favorite restaurants, and it got me thinking about things that go well with cheese. My mind immediately went to the Hot Pepper and Garlic Jelly I made for a friend's wedding, which paired beautifully with the cheese plate.
Almost nothing pairs better with cheese than wine, so I decided to start with a nice, meaty shiraz. The fresh basil leaves, which are steeped in the wine, add just enough of flavor, so as not to be overwhelming. This jelly pairs wonderfully with this super sharp cheddar, although I'm sure it would be just as wonderful with a goat cheese.
This is also a very easy recipe to make, and active cooking and canning time is about 30 minutes. I've also included some easy canning instructions, which won't require any special equipment.
Basil Wine Jelly
Yield - 4 (1/2 pt) jars
2 c red wine
1/2 c basil leaves, cut into strips
1/4 c lemon juice
3 1/2 c sugar
1 (3 oz) pkg liquid pectin (Certo or whichever brand is available)
Bring 1 c wine to boil in a small saucepan. Add basil leaves, remove from heat, and cover. Allow to steep for 30-45 minutes. Strain out basil leaves and discard. Add remaining wine, lemon juice, and sugar to large saucepan, as well as the basil wine. Bring to a rolling boil, and boil 1 minute. Stir in liquid pectin, stirring constantly, and return to a rolling boil. Boil for 1 minute, stirring constantly. Remove from heat. Pour into 1/2 pint jars and seal.
*The easiest way to can is this - wash and dry canning jars thoroughly. Place lids and rings in a pot of barely simmering water. Once jelly is ready, fill a jar, leaving about a 1/8" headspace. With tongs, remove lid and ring from water, place on jar, and tighten, although not all the way. Turn jar upside down on a dishtowel. Repeat with remaining jars. Allow to cool for 10-15 minutes. Turn upright and allow to seal. Tighten rings on all jars. If any of the jars don't seal, simply store in the refrigerator once cool. The other jars can be stored in a pantry for 8 months to a year, if it lasts that long.
One of my favorite things to eat is cheese. Soft cheese, hard cheese, French cheese, goat cheese - almost any kind of cheese you name, I like. Last night, I had a lovely cheese sampler plate at one of my favorite restaurants, and it got me thinking about things that go well with cheese. My mind immediately went to the Hot Pepper and Garlic Jelly I made for a friend's wedding, which paired beautifully with the cheese plate.
Almost nothing pairs better with cheese than wine, so I decided to start with a nice, meaty shiraz. The fresh basil leaves, which are steeped in the wine, add just enough of flavor, so as not to be overwhelming. This jelly pairs wonderfully with this super sharp cheddar, although I'm sure it would be just as wonderful with a goat cheese.
This is also a very easy recipe to make, and active cooking and canning time is about 30 minutes. I've also included some easy canning instructions, which won't require any special equipment.

Basil Wine Jelly
Yield - 4 (1/2 pt) jars
2 c red wine
1/2 c basil leaves, cut into strips
1/4 c lemon juice
3 1/2 c sugar
1 (3 oz) pkg liquid pectin (Certo or whichever brand is available)
Bring 1 c wine to boil in a small saucepan. Add basil leaves, remove from heat, and cover. Allow to steep for 30-45 minutes. Strain out basil leaves and discard. Add remaining wine, lemon juice, and sugar to large saucepan, as well as the basil wine. Bring to a rolling boil, and boil 1 minute. Stir in liquid pectin, stirring constantly, and return to a rolling boil. Boil for 1 minute, stirring constantly. Remove from heat. Pour into 1/2 pint jars and seal.
*The easiest way to can is this - wash and dry canning jars thoroughly. Place lids and rings in a pot of barely simmering water. Once jelly is ready, fill a jar, leaving about a 1/8" headspace. With tongs, remove lid and ring from water, place on jar, and tighten, although not all the way. Turn jar upside down on a dishtowel. Repeat with remaining jars. Allow to cool for 10-15 minutes. Turn upright and allow to seal. Tighten rings on all jars. If any of the jars don't seal, simply store in the refrigerator once cool. The other jars can be stored in a pantry for 8 months to a year, if it lasts that long.
Thursday, October 12, 2006
Curried Zucchini Soup
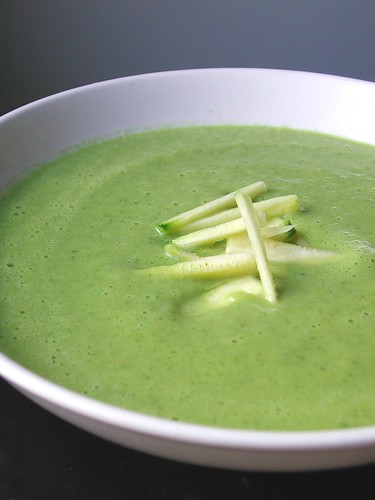
Who doesn't love a feel-good recipe that takes only 20 minutes to prepare? I'm in love with this soup, and the ease of preparation is only the beginning. It utilizes one of my favorite vegetables and a spice I'm just wild about. And since we're heading into soup season, it's time to start pulling out those stock pots for warm and delicious meals. Since this recipe has only 7 ingredients, most of which are already stocked in your pantry, you have no excuse to not try this amazing soup.
Curried Zucchini Soup
2 tbsp olive oil
4 c sliced zucchini
1 c onion, roughly chopped
1 clove garlic, minced
1 tsp curry powder
1 c vegetable broth
1/2 c soymilk
Wash and slice zucchini into 1/4" slices. Heat olive oil in large saucepan over medium-high heat. Add zucchini, onion, and garlic to pan. Saute 5 minutes, until zucchini starts to become translucent. Add curry powder, stir well, and cover pot. Lower heat to low, and cook an additional 10 minutes, or until zucchini is tender. Place zucchini mixture into blender with 1/2 c vegetable broth. Blend until pureed. With motor running, add remaining broth and soymilk. Season to taste with salt and pepper. Serve immediately, or chill and serve cold.
Who doesn't love a feel-good recipe that takes only 20 minutes to prepare? I'm in love with this soup, and the ease of preparation is only the beginning. It utilizes one of my favorite vegetables and a spice I'm just wild about. And since we're heading into soup season, it's time to start pulling out those stock pots for warm and delicious meals. Since this recipe has only 7 ingredients, most of which are already stocked in your pantry, you have no excuse to not try this amazing soup.

Curried Zucchini Soup
2 tbsp olive oil
4 c sliced zucchini
1 c onion, roughly chopped
1 clove garlic, minced
1 tsp curry powder
1 c vegetable broth
1/2 c soymilk
Wash and slice zucchini into 1/4" slices. Heat olive oil in large saucepan over medium-high heat. Add zucchini, onion, and garlic to pan. Saute 5 minutes, until zucchini starts to become translucent. Add curry powder, stir well, and cover pot. Lower heat to low, and cook an additional 10 minutes, or until zucchini is tender. Place zucchini mixture into blender with 1/2 c vegetable broth. Blend until pureed. With motor running, add remaining broth and soymilk. Season to taste with salt and pepper. Serve immediately, or chill and serve cold.
Monday, October 02, 2006
Cilantro Pesto Dip
Every good cook knows it's important to have a few quick and easy to prepare recipes to whip out when unexpected guests arrive. This is one of those that you can make within a matter of minutes, and it's extremely tasty.
This dip combines two of my favorite things, pesto and fresh cilantro. By using low fat or nonfat yogurt, it's easy to keep the fat and calorie content to a minimum. This dip is wonderful served with plantain chips, tortilla chips, or pita wedges.
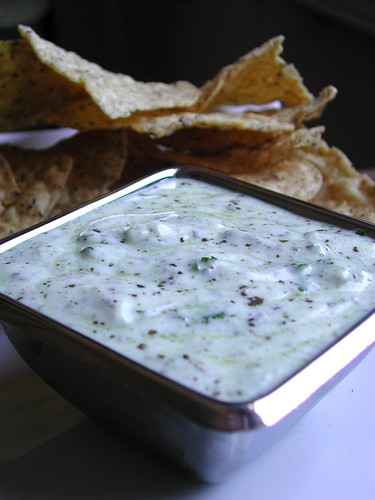
Cilantro Pesto Dip
12 oz plain yogurt
3 tbsp prepared pesto (either homeade or purchased)
1/4 c fresh cilantro, chopped
2 tsp fresh lemon juice
salt/pepper to taste
Combine all ingredients in a bowl and whisk well. Serve immediately, or chill for a bit to allow flavors to combine.
Every good cook knows it's important to have a few quick and easy to prepare recipes to whip out when unexpected guests arrive. This is one of those that you can make within a matter of minutes, and it's extremely tasty.
This dip combines two of my favorite things, pesto and fresh cilantro. By using low fat or nonfat yogurt, it's easy to keep the fat and calorie content to a minimum. This dip is wonderful served with plantain chips, tortilla chips, or pita wedges.

Cilantro Pesto Dip
12 oz plain yogurt
3 tbsp prepared pesto (either homeade or purchased)
1/4 c fresh cilantro, chopped
2 tsp fresh lemon juice
salt/pepper to taste
Combine all ingredients in a bowl and whisk well. Serve immediately, or chill for a bit to allow flavors to combine.